Alright, just an update on my situation here. It has gotten worse, unfortunately :( the car now barely runs and can't really be taken anywhere. There's a misfire at idle and low RPMs when you give it the beans, but once the revs go up it works fine (as stated before). Since it is fairly consistent now I was able to get the duty cycle off of the car WHILE it was misfiring and all associated weirdness. Interestingly, the DC never fluctuated beyond 45-55% while this was happening. When it'd skip, it would go up to about 55% quickly and then come down. Makes sense since there is then unburned fuel going through the system. With this in mind, it is almost certainly electrical. Since I've already gone over the cap, rotor, and wires today, that leaves me with bad plugs, bad coil, or bad ignition control module. I have to dig out the EZL troubleshooting guide (I know I have it somewhere) and rule that out. Not sure how to test the coil other than resistance for the different wire winds.
Also verified:
Wires are low resistance (1k ohms, printed on the terminals and verified as 1.1k though multimeter). Again I have to verify with the manual as to the correct overall resistance spec but from searches on here, having 1kohm wires should necessitate resistor spark plugs, rather than the resistors being in the wire. I don't want this to turn into a resistor v. non resistor post but I am just looking for the TOTAL spec from cap-end-terminal to the tip of the spark plug. I am going to test this out before spending any more money (I am also planning on pulling each individual plug to make sure they're not fouled...the 2 I pulled today looked almost new, which is great since I replaced them 15k ago).
I'm getting there...I'm trying not to throw any more parts on it until I can isolate the issue but everything just seems normal...
Monday, July 9, 2012
Thursday, March 8, 2012
Intermittent stalling, RPM drop, misfiring...oh boy
So it wasn't the OVP. I replaced that with a brand new unit and the problem persists. To refresh, here's what has been plaguing my 300e.
Very intermittently my car loses RPMs and stalls, but ONLY under load. This first happened once in a parking lot after warming up, then again in the driveway. Not too long afterwards, I parked the 300e for a bit since I didn't have a place for it, and it now does it about 40% of starts. It is fine when cold, but after it warms up, the idle becomes rougher and as soon as you step on the gas a bit (still in park) it misfires and shakes badly up until about 2500 RPMs. However, shift it into drive or reverse and it does the same misfiring but the RPMs drop until it stalls. I thought it was the OVP since that is a very common replacement item, but no luck. Also, during this time I found that my EHA valve (stands for electrohydraulic actuator) began to leak massively. Again there was a glimmer of hope, but even after replacing it with a known good part, the problem persists. Actually, I might as well just list all the stuff I've checked
- replaced ovp with new unit
- replaced cap and rotor, just inspected them again today to see if there was anything wacky there...cap had some usual corrosion on contact points but nothing out of the ordinary
- replaced wires, checked again for arcing today and nothing
- replaced EHA (was leaking wildly, had to be done anyways)
- checked engine temp sensor, appears to be fine
- checked the flywheel crank sensor (which goes to EZL), came out to 880 ohms, which is well within spec
- replaced O2 sensor
- fuel pump is always on during this so that rules out FPR
- replaced spark plugs (proper style - ordered from here)
- checked vacuum connections, seems fine
- duty cycle (checked via X11 diagnostic port) remained within 47-51%, which is very good--Lambda tower does not need adjustment.
Really not sure where I am heading from here. I think I am going to replace all of the vacuum lines that I can find and hopefully fix any leak that might exist. Stay tuned....
Thursday, December 15, 2011
Debunking old Mercedes "Myths"
Ever come across a Craigslist ad featuring an old rusty diesel w123 or w126 Mercedes and they're asking an exorbitant amount of money based on a "bulletproof, million mile engine", extreme mileage, "runs on any oil", etc? Well I'm here to set the record straight.
Despite the main aim of this article being the w123 and w126, the logic outlined in this post pretty much applies to any Mercedes diesel up until the late 1990s so.
Myth #1: This engine will go a million miles!
Will it? Well, the answer is yes and no. First of all, its important to establish which engine you're talking about. As far as Mercedes diesels go, there have been a ton of engines over the years. Wikipedia is actually a pretty good source for getting a high level overview of these engines. Here are a number of Wikipedia links where you can read up on each one:
Blow-by - oil vapor that escapes past the piston rings and into the head. You check blow-by by opening the oil cap while running after the engine warms up. Just be careful, oil is hot and its often splashing under that cap! Most older engines will have some blow-by.
Here is an example from the wonderful interwebz:
http://www.youtube.com/watch?v=BnXaMkyA0hw
Blow-by is a decent way of assessing the health of the engine because it is related to the compression of the cylinders which is essential in maintaining diesel ignition. If you have concerns over blow-by before you buy a car, have the seller conduct a compression test. A good rule of thumb is that no cylinder should be below 300psi, and they should all be within 10% of each other. Good compression usually means a well maintained engine. Keep changing that oil in the correct intervals, keep your valves adjusted, and keep an eye on the timing chain and you could easily go to a few hundred thousand miles or well beyond. I mentioned timing chain stretch - this one is also important as it will determine its replacement, and is also a good indicator of maintenance performed on the engine over its lifetime.
Here is a good DIY for checking chain stretch: http://www.peachparts.com/Wikka/OM617TimingChainStretch
Third tell-tale sign of engine health is the fuel system. Is the see-through plastic fuel filter all gunked up? Is it black or really dark brown? That is a sign of fungi in the fuel tank. Not necessarily a deal-breaker but it will give you an indication as to how well the car has been cared for.
If you don't believe me, there is also an awesome wikipedia site on longevity:
http://en.wikipedia.org/wiki/Car_longevity
Note that a 240D (OM616, basically a 4 cyl OM617) hit 2.8 million miles! So yes, they are million mile cars when it boils down to it!
Myth #2: 50 MILES PER GALLON! 100 MPG!
No. Won't happen. Diesel engines in cars DO perform rather efficiently (sad that the U.S. hasn't really picked up on it). For example, the new VW and Audi diesels get excellent mileage in the 40s--older models like the Mk4 Jetta TDI were able to achieve 50mpg (for real, not a myth!). The OM617 in both the w123 and w126 are unable to achieve 35mpg unless you're going downhill with the wind at your back, etc etc. The w126 is a bit more efficient on the highway (lower drag coefficient) and I have personally hit 33mpg in mine. The later 190D (w201) and 300D (w124) have better mileage due to more efficient and more powerful engines, but most report getting numbers in the 30's. If you see an OM617 powered car for sale claiming 40mpg or higher its a bunch of BS.
Myth #3 Runs on anything you can dump in the tank! Great for veggie oil conversion!
Technically true for anything combustible but its not too good for the engine. Be very wary of existing WVO (Waste Veggie Oil) systems. When all parts work, they are nothing to shy away from, BUT I have seen many, many WVO-equipped diesel MBs in the junkyard with crapped out engines. Anecdotal? A bit, but there is science behind it. The reason that WVO systems really make me wary is that longevity via WVO is entirely contingent upon the ability to filter and process the oil initially. Therefore, if the owner is a bit lazy or simply makes a mistake, it can seriously damage the fuel injection system (death to motor, basically). Furthermore, the temperature of WVO is much more sensitive than normal diesel fuel...not a problem in the sunny southwest, but up here in the Northeast, an improperly engineered oil heating system can also cause the aforementioned fuel system woes. Last, there are a number of systems on the market. Some are better and some are worse (you get what you pay for!)...and some are even backyard-engineered. If a seller is asking for higher price based on the ability to convert to WVO, just be aware that the "craze" has sort of died down in recent years. While the OM617 is a fine candidate for those interested in WVO conversion, there is no reason to pay extra for some hype.
Despite the main aim of this article being the w123 and w126, the logic outlined in this post pretty much applies to any Mercedes diesel up until the late 1990s so.
Myth #1: This engine will go a million miles!
Will it? Well, the answer is yes and no. First of all, its important to establish which engine you're talking about. As far as Mercedes diesels go, there have been a ton of engines over the years. Wikipedia is actually a pretty good source for getting a high level overview of these engines. Here are a number of Wikipedia links where you can read up on each one:
- Mercedes-Benz OM601 engine
- Mercedes-Benz OM602 engine
- Mercedes-Benz OM603
- Mercedes-Benz OM604 engine
- Mercedes-Benz OM605 engine
- Mercedes-Benz OM606 engine
- Mercedes-Benz OM611 engine
- Mercedes-Benz OM612 engine
- Mercedes-Benz OM615
- Mercedes-Benz OM616
- Mercedes-Benz OM617 engine
- Mercedes-Benz OM642
- Mercedes-Benz OM647 engine
- Mercedes-Benz OM648 engine
Blow-by - oil vapor that escapes past the piston rings and into the head. You check blow-by by opening the oil cap while running after the engine warms up. Just be careful, oil is hot and its often splashing under that cap! Most older engines will have some blow-by.
Here is an example from the wonderful interwebz:
http://www.youtube.com/watch?v=BnXaMkyA0hw
Blow-by is a decent way of assessing the health of the engine because it is related to the compression of the cylinders which is essential in maintaining diesel ignition. If you have concerns over blow-by before you buy a car, have the seller conduct a compression test. A good rule of thumb is that no cylinder should be below 300psi, and they should all be within 10% of each other. Good compression usually means a well maintained engine. Keep changing that oil in the correct intervals, keep your valves adjusted, and keep an eye on the timing chain and you could easily go to a few hundred thousand miles or well beyond. I mentioned timing chain stretch - this one is also important as it will determine its replacement, and is also a good indicator of maintenance performed on the engine over its lifetime.
Here is a good DIY for checking chain stretch: http://www.peachparts.com/Wikka/OM617TimingChainStretch
Third tell-tale sign of engine health is the fuel system. Is the see-through plastic fuel filter all gunked up? Is it black or really dark brown? That is a sign of fungi in the fuel tank. Not necessarily a deal-breaker but it will give you an indication as to how well the car has been cared for.
If you don't believe me, there is also an awesome wikipedia site on longevity:
http://en.wikipedia.org/wiki/Car_longevity
Note that a 240D (OM616, basically a 4 cyl OM617) hit 2.8 million miles! So yes, they are million mile cars when it boils down to it!
Myth #2: 50 MILES PER GALLON! 100 MPG!
No. Won't happen. Diesel engines in cars DO perform rather efficiently (sad that the U.S. hasn't really picked up on it). For example, the new VW and Audi diesels get excellent mileage in the 40s--older models like the Mk4 Jetta TDI were able to achieve 50mpg (for real, not a myth!). The OM617 in both the w123 and w126 are unable to achieve 35mpg unless you're going downhill with the wind at your back, etc etc. The w126 is a bit more efficient on the highway (lower drag coefficient) and I have personally hit 33mpg in mine. The later 190D (w201) and 300D (w124) have better mileage due to more efficient and more powerful engines, but most report getting numbers in the 30's. If you see an OM617 powered car for sale claiming 40mpg or higher its a bunch of BS.
Myth #3 Runs on anything you can dump in the tank! Great for veggie oil conversion!
Technically true for anything combustible but its not too good for the engine. Be very wary of existing WVO (Waste Veggie Oil) systems. When all parts work, they are nothing to shy away from, BUT I have seen many, many WVO-equipped diesel MBs in the junkyard with crapped out engines. Anecdotal? A bit, but there is science behind it. The reason that WVO systems really make me wary is that longevity via WVO is entirely contingent upon the ability to filter and process the oil initially. Therefore, if the owner is a bit lazy or simply makes a mistake, it can seriously damage the fuel injection system (death to motor, basically). Furthermore, the temperature of WVO is much more sensitive than normal diesel fuel...not a problem in the sunny southwest, but up here in the Northeast, an improperly engineered oil heating system can also cause the aforementioned fuel system woes. Last, there are a number of systems on the market. Some are better and some are worse (you get what you pay for!)...and some are even backyard-engineered. If a seller is asking for higher price based on the ability to convert to WVO, just be aware that the "craze" has sort of died down in recent years. While the OM617 is a fine candidate for those interested in WVO conversion, there is no reason to pay extra for some hype.
Wednesday, September 28, 2011
The plot thickens...300E stalling
Its been a while since I've updated this because I have been unbelievably busy. School started up again and the 300E began to stall when up to temp. There are so many things that can cause the engine to stall out in this fashion, let me describe my circumstances:
First time it ever did this was in the parking lot of a local supermarket when I was out on a really quick grocery run. I parked the car (only had gone about a mile from my apartment), went inside, got what I needed and came back out in about 5 minutes. Starting up the car, it stumbled just a tad but seemed pretty normal idling. As soon as I put any load on the engine (so basically when I shifted into reverse) it immediately stalled. I was able to push it back into the space, start it up and idle it again. I popped the hood and didn't notice anything out of place...checked the OVP for any visible signs of fuse failure, and nothing out of the ordinary. I got back in and revved the engine a bit and noticed a misfire whenever I had my foot on the gas to rev it (would not misfire coming back down, only under a load). After about 5 minutes it fixed itself and I was able to drive home.
Second time was after I replaced a burst coolant hose. I was terrified that in the process I had blown the head gasket by localized overheating (though the car did not get above 110* on the gauge) and I was suffering from low compression. However I realized it was the same odd issue as I experienced above. I figured in the process of checking everything out under the hood I jostled some vacuum lines...I made sure they were all in their respective places, ordered a new valve cover-to-air cleaner tube and installed it. The problem went away after that so I thought I had fixed it
Now, I have parked my 300E at my parents' for the most part, until I can sort out DMV inspection stuff. I ended up buying a new car about a month ago since I needed something that would not break down at ALL, and would not cost me money to repair if it did (read: warantee). My dad calls me a couple weeks ago and told me how he went out to grab a sandwich from a local deli and the car died after he got back in. Oh great! The mystery lives on!
So far I have replaced the overvoltage protection relay (OVP) which is perhaps the most common failure in these cars at this age...did not fix the problem, but its good to have a spare OVP in the glove box for when it inevitably does fail so no harm no foul. I initially suspected the OVP because it intermittently fails (exhibiting the exact symptoms I had) before an ultimate failure. The signal and power for the engine computer goes through the OVP, which is the reason the car runs like crap upon its failure. My next culprit is the O2 sensor, which is a logical choice seeing as the car only behaves badly after it warms up, then the engine temp sensor. I'm going to have to spend quite a lot of time with my digital multimeter at some point, just have no idea when I am going to find that time, especially considering the fact that the car is a few hours away from me at this point and my semester is in full swing. Oh well, this is the reality of owning old MBs, its a labor of love. My 300SD is still inoperable due to a bad transmission too, so the only thing I have at the moment is my brand new car (which I do love).
Sunday, June 19, 2011
More B2 transmission woes
The other day, I was taking my 300SD to the store, and stopped in a gas station to fill up. After putting in $70 of diesel I shifted into drive and heard a little clunk. My immediate thought was that I left the fuel nozzle in the car so I jumped out and checked too see if I hit anything or of the nozzle was still in. Everything looked normal until...I shifted into drive and it went NOWHERE. Luckily, reverse still worked and I backed it into a parking spot while I figured out what to do with it.
Now, when this happened I knew exactly what was wrong. When I first got that engine and transmission (in the brown car) I replaced the B2 piston in the car, which is not a tough job at all. I had also replaced the seal and old style metal bushing with updated parts from Mercedes. Everything was working fine for about 30k and then this happened. Unfortunately, mine was a bit worse than I thought - I actually broke the band. Let me explain how the band works in the transmission.
When you shift into drive (or one of the lower gears), the valve body engages the B2 piston via hydraulic pressure. The B2 piston moves in and out, which pushes on a "pin", more commonly called a dog bone because of its shape, which seats in a receptacle on the B2 brake band that causes it to engage when pushed in. The B2 brake band piston is a common failure item because Mercedes originally used a steel bushing to seal the inner plunger of the piston. It doesn't take a rocket scientist to realize that this would wear down the aluminum bore and piston due to it being a harder metal--so Mercedes released a nylon bushing design along with a couple new redesigns for the piston itself. You also need the seal that holds the bushing in place (this is often overlooked) which went from a rounded shoulder to a square shoulder. The seal is just like a normal wheel seal or oil seal, but smaller (I could not find one at Napa, had to order through MB).
Mercedes-Benz Transmission terminology for dummies (722.XXX series transmissions)
I find that a lot of people immediately go to the internet and ask "why is my transmission not working" only to receive a number of seemingly cryptic answers filled with letters, numbers, and foreign terminology. Here is a quick crash-course on the most common terms and references when talking about these transmissions.
B1 - controls 2nd gear. A bad B1 band or piston will make the car shift from first to third.
B2 - most common failure in Mercedes transmissions for years, controls first gear, "shifting into drive"
B3 - reverse gear brake band. Some models of MB transmissions can be adjusted externally to reduce slipping and flaring when engaging reverse, others do not have this feature. If you have an older Mercedes with no reverse, the B3 is the most likely cause. I see this especially in the gas w124s and w201s for some reason, many many cars on the market with no reverse. This requires a trans rebuild to fix.
K1 spring - this is a spring in the valve body that controls the 2nd-to-3rd gear shift. Over time, both the K1 and K2 springs wear out and cause the transmission to flare a bit between shifts. There are "repair kits" available with new springs and seals for the DIYers, not a difficult fix. These springs actually control how the corresponding clutches (called K1 and K2 clutch packs) operate.
K2 spring - similar to K1 controls the 3rd-to-4th shift, along with reverse and overdrive.
"Flaring" - this refers to the RPMs spiking in between shifts under normal driving. This is usually caused by either overly-soft shifts (worn out springs and/or vacuum issues).
"slipping" - This means the car goes in and out of gear, typically creating a jerking motion under acceleration, sometimes also a bad jutter.
Vacuum tuning - The 722.xxx series transmission shifts are controlled by vacuum. A line comes off the engine and plugs into a part called the "vacuum shift modulator" on the passenger side, that will denote how firmly or how softly the car will shift between gears. If you completely disconnect the vacuum line, shifts will be extremely firm (neck-snapping in my diesel!). You can adjust the modulator by turning a plastic tee-connector on the outside of the transmission.
Bowden Cable - This adjusts the shift points. The Bowden cable is attached to the throttle linkage, and basically tells the transmission how far down you're pressing the accelerator...floor it and the shift points will be predictably higher. This typically cable stretches over the years and needs tightening, which can be done on top of the valve cover at a white cable-screw followed by a rubber accordion cover.
Symptoms of a bad B2 piston - If your piston is scratched or scored, it will "catch" on the outer bore of the transmission housing, bushing or seal. This causes intermittent engaging of the forward drive gears. Basically, you can shift into drive, but the second you put any load on the transmission it slips. You won't be going anywhere fast. Many times a sticking B2 will turn into a broken B2 piston since the hydraulic pressure is extremely high, and scoring is only going to get worse (i.e. don't wait to fix it!).
Symptoms of a bad B2 band - this is what I'm dealing with at the moment. The piston itself is fine, no catching, marring, or scoring. However, there is no spring tension on the B2. I am able to push the piston in and it will not push out against my pressure - it should have quite a lot of pressure on it, so much that it is a difficult task to replace the outside cover without some sort of improvised "tool" jammed in between it and the transmission housing (I used a pipe the first time). There is NO drive, no forward motion whatsoever. To expand even more, you will not see a change in RPMs when shifting into drive, and not hear any hydraulic actuation under the car when you shift. Strangely, when mine went, there was no debris in the pan indicating it was a clean break or the debris is stuck somewhere (very possibly the valve body).
I am currently looking at a full trans rebuild (fully within my mechanical capabilities) but unfortunately I don't really have the space to do it since the car is in a friends' driveway and I am 250 miles away from home base where all my tools, stands, hoists, etc. are...although my trusty little socket set has gotten me pretty far before!
Wednesday, June 15, 2011
w126 ignition tumbler, not something to mess with!
I realize I haven't posted in a while here so I'm playing catch-up! Here are some details about my ignition tumbler issues that I suffered about 2 years ago.
Here's what happened - my tumbler was "loose" but never had any trouble turning. I figured I'd be a little proactive and completely replace the tumbler before it started wearing out even more. Usually this is a super easy job, consisting of about 5 minutes of your time and an unbent paperclip. Somehow, when I inserted the paperclip and turned the tumbler, it got completely stuck! No movement either way. This would be the same problem and solution for all of you who actually have had a completely stuck ignition tumbler as well, not just my folly. Taking a look at the ignition face, there is no way to actually get the tumbler out without turning the key...unless you've got a good grinder and a drill!
1. Take out gauge cluster using the bent-coathanger method
2. Loosen bolts on the underside of the steering column and let it drop (gives about 1.5"). Taking off the steering wheel can help as well, but most of the time the retaining bolt is stuck on there with an ungodly amount of loctite and torque, I was unable to get mine to budge.
3. Here's where it gets fun. There's a little "pin" maybe 3/8" in diameter that holds the ignition assembly to the steering column. It is part of the steering lock mechanism. Some experienced folks on the internet have had success with punching this pin into the column with a drift, but I gave it everything and the damn thing did not budge. Time to take out the dremel! About 5 minutes with a tungsten carbide grinding bit and the pin was no more. This step is much easier said than done. There is almost NO room to work, and you need to get creative to find an angle that works. I was able to slip the dremel in between the plastic steering column sheath (you can take this off if you get the steering wheel off) and the dash...a large socket was used as a spacer since there is some flex in both materials. It was just enough to get the dremel bit in. After grinding down the pin, you should be able to rotate the entire ignition switch mechanism within the steering lock housing.
4. With the ignition switch assembly freely rotating, it should slide out with some coaxing. It isn't easy and still very tight in there, but I was able to get it out and have the igition switch dangling down below the column.
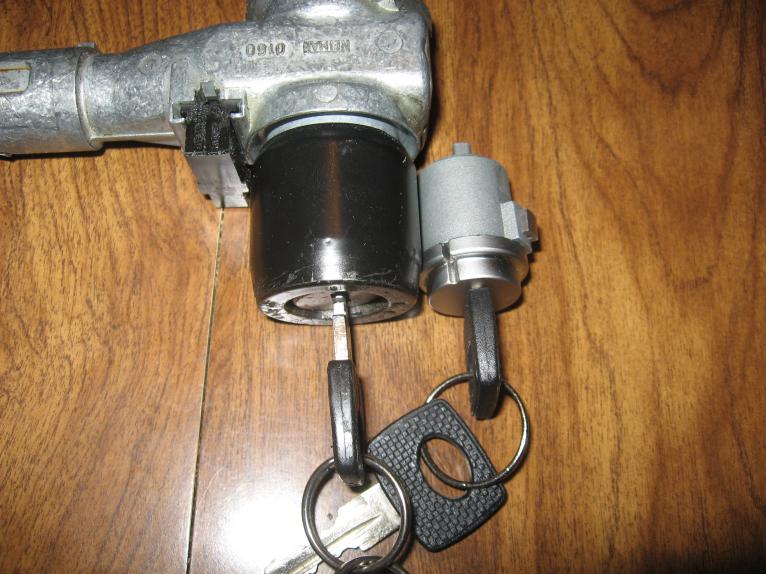
5. Grind off the heads of the screws that hold the back portion of the ignition switch on (i.e. all the wires and vacuum lines side). This will separate the actual ignition switch from the tumbler and steering lock areas. It will also allow you to work on the tumbler mechanism on the bench and outside of the car. Here is a picture of the stuck tumbler/lock assembly on the left and a new tumbler on the right.
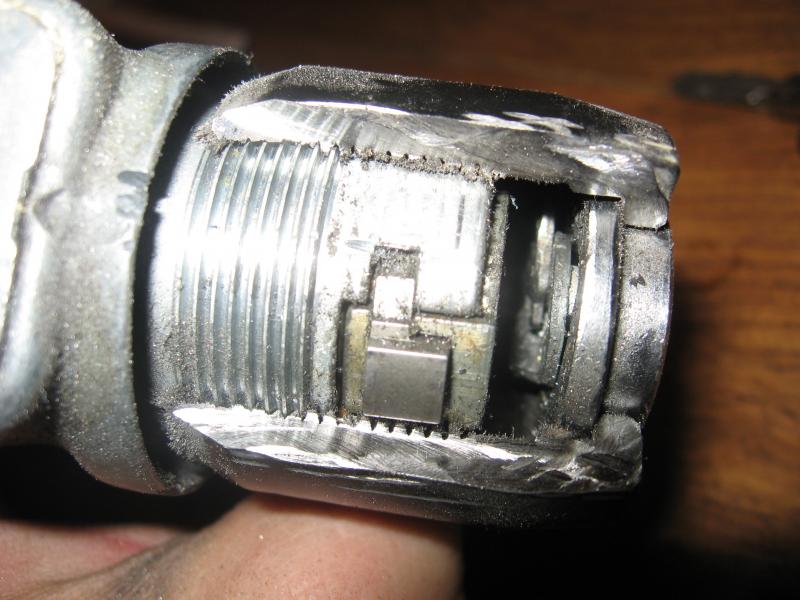
6. The plot thickens. Since the metal ring around the tumbler was not moving, more grinding is in store. Putting the new tumbler next to the old, I was able to figure out where the detent was in the ring and tumbler. I cut the ring's detent lock around that area to free the old tumbler:
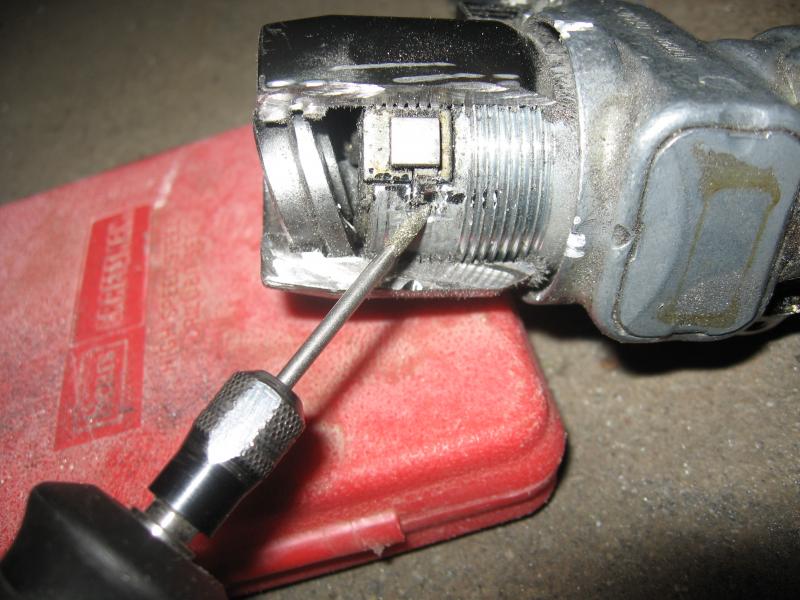
7. More grinding. I needed to grind the old tumbler's detent down so that I could more easily unscrew that hardened steel ring. That was a pain, by the way--that steel is TOUGH and it takes a lot of cutting and patience. You can see how the tumbler appears to have completely imploded and fallen apart.
 8. Finally, after much grinding and fitting, the old tumbler can come out. Small victory:
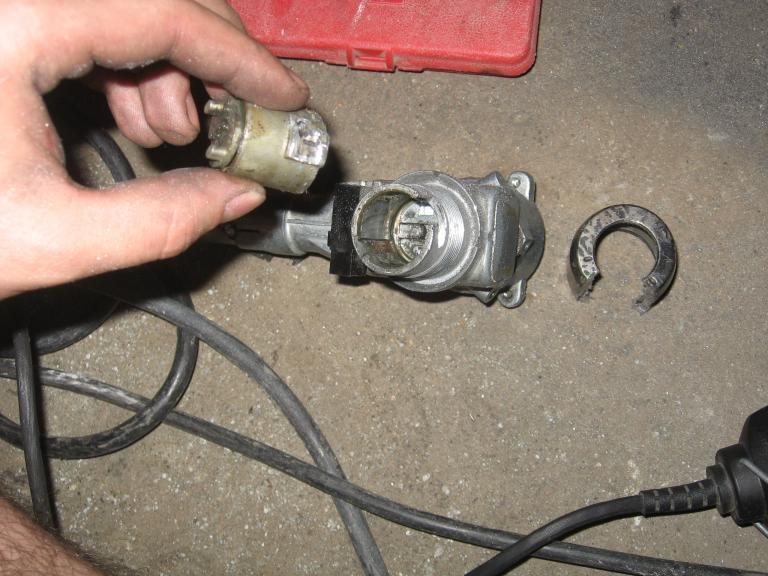
The new tumbler went in easily!
9. Reassemble, pretty much the reverse (minus grinding) of disassembly. To get the ignition switch back together, I just tightly wrapped electrical tape around the two portions. It lasted 30k miles until the car was parked with no fuss at all. Even the steering lock still works somehow, the pin that I ground down was still slightly large enough to catch just a bit in the hole and secure the mechanism. I imagine it could be removed with a punch now.
Moral of the whole story is: don't wait too late to replace that sticking ignition tumbler!!
Here's what happened - my tumbler was "loose" but never had any trouble turning. I figured I'd be a little proactive and completely replace the tumbler before it started wearing out even more. Usually this is a super easy job, consisting of about 5 minutes of your time and an unbent paperclip. Somehow, when I inserted the paperclip and turned the tumbler, it got completely stuck! No movement either way. This would be the same problem and solution for all of you who actually have had a completely stuck ignition tumbler as well, not just my folly. Taking a look at the ignition face, there is no way to actually get the tumbler out without turning the key...unless you've got a good grinder and a drill!
1. Take out gauge cluster using the bent-coathanger method
2. Loosen bolts on the underside of the steering column and let it drop (gives about 1.5"). Taking off the steering wheel can help as well, but most of the time the retaining bolt is stuck on there with an ungodly amount of loctite and torque, I was unable to get mine to budge.
3. Here's where it gets fun. There's a little "pin" maybe 3/8" in diameter that holds the ignition assembly to the steering column. It is part of the steering lock mechanism. Some experienced folks on the internet have had success with punching this pin into the column with a drift, but I gave it everything and the damn thing did not budge. Time to take out the dremel! About 5 minutes with a tungsten carbide grinding bit and the pin was no more. This step is much easier said than done. There is almost NO room to work, and you need to get creative to find an angle that works. I was able to slip the dremel in between the plastic steering column sheath (you can take this off if you get the steering wheel off) and the dash...a large socket was used as a spacer since there is some flex in both materials. It was just enough to get the dremel bit in. After grinding down the pin, you should be able to rotate the entire ignition switch mechanism within the steering lock housing.
4. With the ignition switch assembly freely rotating, it should slide out with some coaxing. It isn't easy and still very tight in there, but I was able to get it out and have the igition switch dangling down below the column.
5. Grind off the heads of the screws that hold the back portion of the ignition switch on (i.e. all the wires and vacuum lines side). This will separate the actual ignition switch from the tumbler and steering lock areas. It will also allow you to work on the tumbler mechanism on the bench and outside of the car. Here is a picture of the stuck tumbler/lock assembly on the left and a new tumbler on the right.
6. The plot thickens. Since the metal ring around the tumbler was not moving, more grinding is in store. Putting the new tumbler next to the old, I was able to figure out where the detent was in the ring and tumbler. I cut the ring's detent lock around that area to free the old tumbler:
7. More grinding. I needed to grind the old tumbler's detent down so that I could more easily unscrew that hardened steel ring. That was a pain, by the way--that steel is TOUGH and it takes a lot of cutting and patience. You can see how the tumbler appears to have completely imploded and fallen apart.
The new tumbler went in easily!
9. Reassemble, pretty much the reverse (minus grinding) of disassembly. To get the ignition switch back together, I just tightly wrapped electrical tape around the two portions. It lasted 30k miles until the car was parked with no fuss at all. Even the steering lock still works somehow, the pin that I ground down was still slightly large enough to catch just a bit in the hole and secure the mechanism. I imagine it could be removed with a punch now.
Moral of the whole story is: don't wait too late to replace that sticking ignition tumbler!!
Saturday, April 9, 2011
Fiber optics in the w126
One of the most frustrating parts of working on these w126s is the way in which Mercedes decided to light all of their console switches and instrument cluster. Being high tech, they went with a fiber optic system that delivers light via an external socket. Let me get more into detail here.
The two areas that people most often come in contact with these fiber optics is the instrument cluster and the center console. First lets tackle the instrument cluster. The cluster has long been a point of contention with Mercedes owners as these cars grow older, since the lighting becomes worse and worse until the driver (dangerously) cannot read the gauges at night. Problem number one is the rheostat. The springs that the company used in the rheostat fail pretty commonly. This results in NO lights whatsoever. I recommend jumping the rheostat, which consists of simply putting a jumper wire between the two solder joints on the board. If you want to do any LED modification or anything you'd have too do this anyways to help regulate the current.
The bigger problem with the instrument cluster is the delivery of light to the gauge faces themselves. The bulbs are located in the back of the instrument cluster next to the blinker bulbs. Easy to replace for sure, but if you look closely the light has to travel through crystals over the top of the plastic housing and then refract back down on the instruments. In the bulb sockets themselves, about 90% of the clusters that I have seen have black charring (presumably from long time burning of bulbs, perhaps incorrect bulbs?) on the face of the fiber optic prisms. I have also seen the prisms melted from having too hot of a bulb in there--obviously this doesn't help either. In addition, all sorts of dust can get caught in there and is very difficult to clean. My solution was to completely bypass the fiber optics in the instrument cluster and go with a homemade LED setup. I mounted the LEDs where the prisms came out to light the gauges, and soldered them back to the bulb sockets. The LEDs were actually far too bright so I had to shield some of the light with electrical tape...even that is still very bright, but that is my preference for dash lighting.
On to the center console. All of the switches on the top of the console except for hazard lights --rear reading lights, defrost, sunroof, and antenna (may be more depending on options) are lit by means of fiber optic cables in back of the dash. There is one light strand, much like a christmas tree wire, powering all the climate control and switch lights. I believe these are wired in series so if one bulb goes out, the following will also go out. There are 4 bulbs located in the climate control unit (I will get to that in a second) and one bulb reaches back into the firewall to a cluster commonly called either and octopus or a spider. The fiber optic wires coming off of it go to each of the top switches, and one goes down into the shifter console to light the PRNDSL selection. Conveniently, my octopus was completely torn apart by the previous owner who pretty much scrapped the whole interior. After many hours of toiling I recommend just forgetting about it, you won't easily get those fiber optic cables back into the octopus--it is so far back against the firewall, it gives almost no room to work, especially for a precise placement of these wires.
Back to the light strand. The first two bulbs on the strand light the left side of the climate control--the wheel and left couple buttons. Then, the strand reaches back to the firewall where ONE bulb (stock bulbs are pretty dim) lights all of the switches and center console, then the next two bulbs return to the climate control to light the right flap buttons and fan speed/auto buttons. Since I gave up on the octopus, none of my switches light up except for the hazard lights, and I replaced my climate control bulbs with LEDs to compliment the blue feel of the car. Any questions please leave in comments section. Thanks!
Subscribe to:
Posts (Atom)